If you’re having trouble with your print screen function not working, don’t worry! In this blog, we’ll walk you through some troubleshooting steps to help you get it back up and running.
Why is My Print Screen Not Working Windows 10

The Print Screen button may not work for many reasons.
- This could be a hardware problem. Verify the USB or PS2 cable connection. Check that the driver supports it.
- Check for any problems with your Bluetooth keyboard.
- You must ensure that the keyboard has not suffered any physical damage. This includes any liquid damage, such as water or spillage.
- There may be some Windows 10 updates that are urgently needed.
- Sometimes the problem can be caused by outdated or new drivers. It is worth looking into.
- You must ensure that the hotkeys you use are correct for your laptop or manufacturer. Many times, shortcut keys for HP, Lenovo and Dell are different.
- You can check to see if there is an app that’s causing the problem.
- You may experience the same issue if you use third-party screenshot capturing software.
- You should be looking for malware and viruses.
- This place is also worth checking out if you use Cloud storage.
Below you will find solutions to these issues and other guides. If none of these solutions work, you may need to reset your Windows.
How to enable Print Screen Key in Windows 10 to Launch Screen Snipping
- To open Easy of Access, press the Window key + U
- Scroll down to Keyword in the left pane and click on it.
- Scroll down to the Print Screen Shortcut section on the right and turn it ON, as shown below.
Solution 1: Stop Background programs

Many applications can interfere with Windows 10’s Print Screen function. Users have discovered that some image editors, such as Movavi, can cause conflicts with Windows 10’s Print Screen function. You can stop this from happening by closing any other application that might cause conflict like this.
You can test whether an application or service is interfering with your Print Screen key by booting into Safe Mode.
Safe mode allows your computers to start with only the Windows 10 components. This will allow you to determine if the Print Screen error was caused by a third-party application.
- To launch Run, hold down the Windows + R keys. Enter “msconfig” in the search box and click on the OK button.

- Use the menu at the top to switch to the Boot tab.
- Check Safe boot under Boot options. Next, click on the OK button to set the boot option to the Minimal default setting.

- Start your computer again and let it boot fully in Safe Mode. All third-party programs will be stopped by this.
- Check if your Print Screen key is working. You can immediately see if the method was successful by checking if a new screenshot is added to the “C:\Users\user\Pictures\Screenshots” folder.
- You can repeat the previous steps, but you must uncheck Safe boot. When done, click OK.
- Restart your computer to determine which application is causing the problem.
- Check if your Print Screen key is working. You can immediately see if the method was successful by checking if a new screenshot is added to the “C:\Users\user\Pictures\Screenshots” folder. Try the following alternative solution if you are still having trouble capturing your screen.
Solution 2: Check if you’re using Print Screen correctly

You might need to press another key on some devices in order to capture your screen. The Function (Fn), usually located next to your Windows key, is this key. To verify that the shortcut works press the Fn key and the Print Screen key simultaneously.
Another option is to use the Fn + Windows key + print screen combination.
This key combination will check if the Print Screen key works. You can immediately see if the method was successful by checking if a new screenshot is added to the “C:\Users\user\Pictures\Screenshots” folder.
Solution 3: Update your keyboard drivers

Your drivers can also become obsolete, just like your system. You can fix your keyboard drivers by updating them quickly.
- Use the Windows + X keys to access the keyboard. Click on the Device Manager option in the menu.
- Click on the arrow to expand the Keyboards menu.
- Right-click Standard PS/2 Keyboard to select Update Driver
- To allow Windows 10 to search automatically for the latest driver software, select “Search Automatically for Updated Driver Software” and follow any on-screen instructions.
- Check if your Print Screen key is working. You can immediately see if the method was successful by checking if a new screenshot is added to the “C:\Users\user\Pictures\Screenshots” folder.
Solution 4: Run the Hardware troubleshooter for your keyboard

Windows 10 has a number of built-in troubleshooters to help you solve problems on your computer. Microsoft benefits from this feature as it makes it easier for users to find solutions.
Users report that the Hardware Troubleshooter can resolve issues with the Print Screen function. These steps will show you how to reach and run the troubleshooter.
- Use the Windows + I keyboard shortcut to launch the Settings app.
- Click on the Update and security tile.
- Select Troubleshoot from the menu on the left side.
- Scroll down until the Keyboard option is visible. After clicking on it, click on the Run the Troubleshooter button. Wait for any problems to be identified.
- Check if your Print Screen key is working. You can immediately see if the method was successful by checking if a new screenshot is added to the “C:\Users\user\Pictures\Screenshots” folder.
Solution 5: Update Windows 10 to the latest version

If none of these methods work, you might try upgrading to Windows 10. This will fix bugs, provide new features, and patch security holes.
Here are the steps to update Windows 10.
- Click on Start and select Settings. You can also use the Windows + I keyboard shortcut to get faster access.
- Click on the Update and Security tile.
- You should always use the default Windows Update tab.
- Click the Check for Updates button.
- Click on the Install button if an update is available. Wait for Windows 10 to download the update and then apply it.
- Check if your Print Screen key is working. You can immediately see if the method was successful by checking if a new screenshot is added to the “C:\Users\user\Pictures\Screenshots” folder.
Solution 6: Check out the F-Lock key

F-lock keys enable or disable secondary functions for keys F1 through F12. An LED indicator may be included on keyboards that have an F-lock key to indicate whether F-lock is active or disabled. To turn it off, press the Flock key if it is on. Check if your Print Screen works properly now.
Solution 7: Check your OneDrive settings
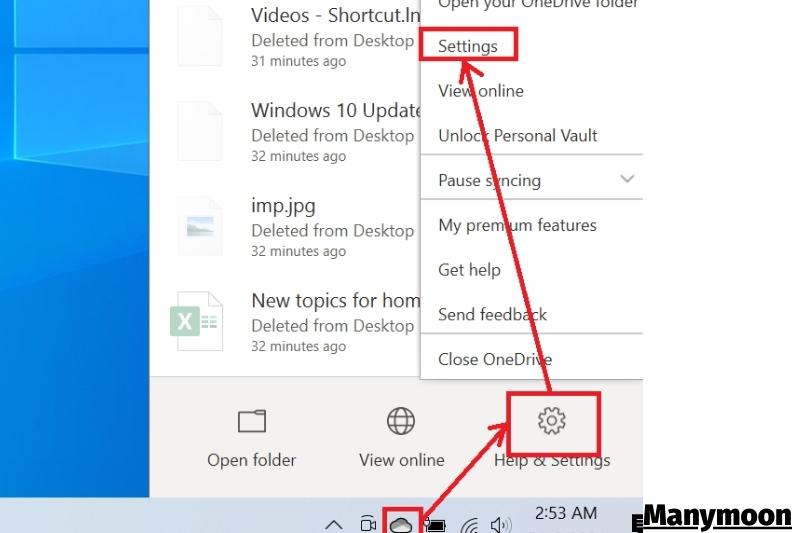
Check if OneDrive is causing your Print Screen Key not to work if you are using OneDrive on your computer. This is a common issue for users who use Microsoft’s cloud storage to back up their files.
This can be done from OneDrive’s settings. Click on the OneDrive icon at the bottom of your taskbar, and then click on Settings. Next, switch to Backup.
You’ll find a checkbox under the Screenshots section that says, “Automatically Save Screenshots I Capture to OneDrive.” Make certain that you have this checked.
Solution 8: Clean Boot your Computer

If this fails, you can clean and boot your computer. While clean booting will allow Windows to restart as normal, it will not allow drivers to load. This will allow you to pinpoint the problem.
- Click Windows + R to clean and boot your computer. Type MSConfig and click OK. This will open System Configuration.
- You’ll find two checkboxes under the General tab. You can uncheck the box that says Load startup items, and you can leave the box for Load system service checked.
- Next, click on the Services tab. You’ll find a checkbox that says Hide all Microsoft Services at the bottom left. That box should be checked.
You should now have a list of services. Next, click on Disable all and then click OK. The computer will only boot with Microsoft’s services when you restart it. To test it, use the Print Screen key.
Solution 9: Modify the Registry

To fix the problem with the Print Screen not working, you can edit the registry using Registry Editor. You should not make a mistake when editing the registry. This could negatively impact your computer. Before you attempt to fix this issue, create a System Restore Point and back up your files.
- Press Windows + R to open Registry Editor. Type regedit. Click OK or Enter.
- Navigate to HKEY_CURRENT_USER\Software\Microsoft\Windows\CurrentVersion\Explorer.
- Right-click the Explorer folder and select New > DWORD. Change the Value name to ScreenShotIndex. Click OK to set the Value data for the DWORD at 4.
- Next, navigate to HKEY_CURRENT_USER\Software\Microsoft\Windows\CurrentVersion\Explorer\User Shell Folders.
- Look for the string named B7BEDE81-DF94-4682-A7D8-57A52620B86F and double-click to open it.
- Ensure that the Value data is set to %USERPROFILE%\Pictures\Screenshots.
If this file is not available, create a String Value similar to the DWORD and then use the values above in the Value name or Value data fields.
This may not work. Try changing the Value field of the ScreenShotIndexDWORD from 495 to 695.
Solution 10: Screenshots can be captured using the Game Bar

The Game Bar is another great option. It’s a Windows 10 feature. Many gamers and users can capture screenshots and videos of their Windows 10 gameplay with it. You can use it to capture screenshots or record screens.
- To open the Game Bar, press the Windows Key + G
- You will find a Screen Capture option in the upper-left section of the tools. Click on it.
- The screenshot will be saved once you click it. The location would be: This computer > Local Disk C > Username>> Videos > Captures
It’s a great tool that you can keep around in case there is no other way to take screenshots of your Windows 10 system.
Solution 11: Find an Alternative Way To Capture Your Screen

Many applications allow you to capture your screen, even if the default key doesn’t work. Below is a list of top free apps that you can use to capture Windows 10’s screen.
- Lightshot
- Camtasia
- Skitch
- Snagit
- VideoProc
FAQs

1. Why can’t Windows 10 take a screenshot?
Answer: Sometimes, the F Mode or F Lock keys on the keyboard can disable the PrtScn keyword. This means that PrtScn cannot be used to take screenshots in Windows 10. To enable PrtScn in Windows to take screenshots, these keys must be pressed again.
2. Why Windows Shift is not working?
Some users are experiencing an issue where the Windows Shift S hotkey does not work on their Windows 10 PCs. The problem is caused by a conflict between OneNote keyboard shortcuts and the Snipping Tool.
3. How can I enable screenshots on Windows 10?
The Windows key + Print Screen
To capture a screenshot in Windows 10 and save it automatically, use the Windows key + PrtScn. The screen will be dimming will cause the screen to go black. A screenshot of the entire screen will be saved to the Screenshots folder.
Conclusion
There could be a number of reasons why the print screen function is not working. The first thing to check is whether the print screen key itself is functioning properly. If it is, then the next thing to check is the software that you are using. Make sure that you have the latest version installed and that your computer meets the minimum system requirements.
Manymoon hopes that you found these tips useful! If so, please share this tutorial with your friends and colleagues.